-
![]()
Daisy
Daisy is the Senior editor of the writing team for EaseUS. She has been working in EaseUS for over ten years, starting from a technical writer to a team leader of the content group. As a professional author for over 10 years, she writes a lot to help people overcome their tech troubles.…Read full bio -
Jane is an experienced editor for EaseUS focused on tech blog writing. Familiar with all kinds of video editing and screen recording software on the market, she specializes in composing posts about recording and editing videos. All the topics she chooses …Read full bio
-
![]()
Crystal Chen
Crystal Chen is very interested in technology products. Experiencing many technological applications, She is willing to solve users' problems through writing tech-related articles. Through her words, you can find various solutions to solve one issue. …Read full bio -
![]()
Melissa Lee
Melissa is a sophisticated editor for EaseUS in tech blog writing. She is proficient in writing articles related to multimedia tools including screen recording, video editing, and PDF file conversion. Also, she's starting to write blogs about data security, including articles about data recovery, disk partitioning, data backup, etc.…Read full bio -
Jean has been working as a professional website editor for quite a long time. Her articles focus on topics of computer backup, data security tips, data recovery, and disk partitioning. Also, she writes many guides and tutorials on PC hardware & software troubleshooting. She keeps two lovely parrots and likes making vlogs of pets. With experience in video recording and video editing, she starts writing blogs on multimedia topics now.…Read full bio
-
![]()
Jerry
Jerry is a fan of science and technology, aiming to make readers' tech life easy and enjoyable. He loves exploring new technologies and writing technical how-to tips. All the topics he chooses aim to offer users more instructive information.…Read full bio -
Larissa has rich experience in writing technical articles. After joining EaseUS, she frantically learned about data recovery, disk partitioning, data backup, screen recorder, disk clone, and other related knowledge. Now she is able to master the relevant content proficiently and write effective step-by-step guides on various computer issues.…Read full bio
-
![]()
Rel
Rel has always maintained a strong curiosity about the computer field and is committed to the research of the most efficient and practical computer problem solutions.…Read full bio -
![]()
Gemma
Gemma is member of EaseUS team and has been committed to creating valuable content in fields about file recovery, partition management, and data backup etc. for many years. She loves to help users solve various types of computer related issues.…Read full bio
Page Table of Contents
0Views|0min read
GoToMeeting is a great tool that sets up an online meeting and empowers your remote workforce in real-time on the internet. When using this meeting application, do you know how to capture the essential points or tidy up the minutes of the meeting effectively? The easiest way is to capture it with a screen recorder. After that, you can check the details in the saved video. Here, this post provides you with reliable ways of GoToMeeting recording.
Capture GoToMeeting on Windows/Mac with Built-in Recorder
With the default tool of GoToMeeting, capturing the session is effortless. It allows you to grab audio and video simultaneously, and the recording footage will be saved directly in the cloud without spending time uploading. Meanwhile, this tool is compatible with Windows and Mac, which is very functional for users.
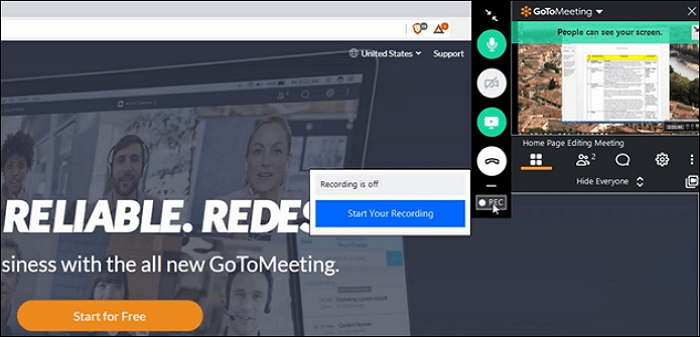
Check the following steps if you don't know how to use this default GoToMeeting记录:
Step 1.Launch GoToMeeting on your Mac or Windows. Begin the meeting on this desktop application.
Step 2.Then, from "Control Panel", click the "REC" button to start it. Once the capturing is finished, click "Stop Your Recording" to end it. Later, you can find the video from the "Meeting History".
Step 3.Finally, you can play the video to see more details and also get a link to share with others.
Although the GoToMeeting recorder is very convenient, there are some limitations in this built-in tool:
- The task stops if the hard disk is less than 100MB
- The output format is limited
- The quality is sometimes affected by an intermittent blank screen
For these reasons mentioned above, most users may choose another practical tool to record GoToMeeting. Next, a good recommendation is introduced to you to work with that.
Make GoToMeeting Recording on Windows/Mac via an Advised Tool
EaseUS RecExpertsis the most advised tool to capture the GoToMeeting discussion on Windows and Mac as it has more fantastic functions when capturing. Before starting, set the output formats as you want, including MP4, MOV, AVI, etc. Also, the regional screen capturing allows you to capture the selected area of the screen based on your needs. Meanwhile, you can use it to record GoToMeeting as an attendee.
Besides, recording the webcam with external sound is allowed. Capturing GoToMeeting with a webcam is useful when having an online discussion. Last but not least, this tool allows taking a GoToMeeting screenshot freely, using the custom hotkey. With this program, capturing GoToMeeting webinars is not a hard task.
Main features of this practical tool:
- Capture the certain area of the screen
- Record screen and webcamat the same time
- Use task schedule to start capturing automatically
- Export the video in multiple formats, such as MP4, MOV, FLV, etc.
- Customize settings in the video in terms of frame rate, quality, etc.
Now, have this powerful tool for capturing GoToMeeting and find more special features!
For Mac users, check the tutorial below to look at the guide.
Related Article: >>How toRecord screen with audio on Mac
When it comes to Windows users, check the guide on how to record GoToMeeting sessions on Windows:
Step 1.Go to the meetings that you want to record. Then, launch EaseUS RecExperts on your devices. Choose the"Full Screen"recording mode or select the recording area in the"Region"mode.
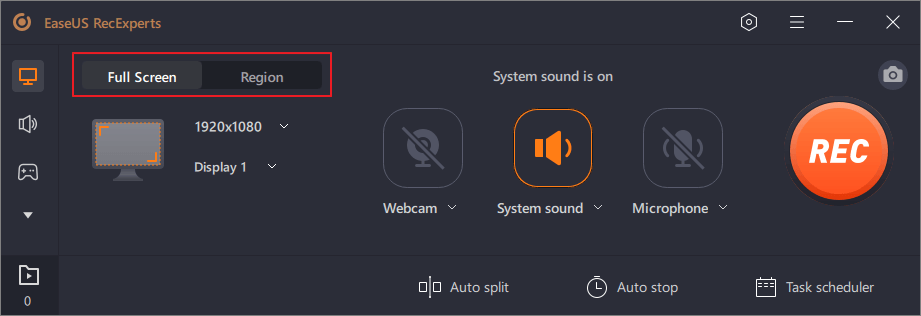
Step 2.Choose to record the system sound, microphone sound or none by clicking on the according buttons. When it's time to start recording, click on the red"REC"button to begin.
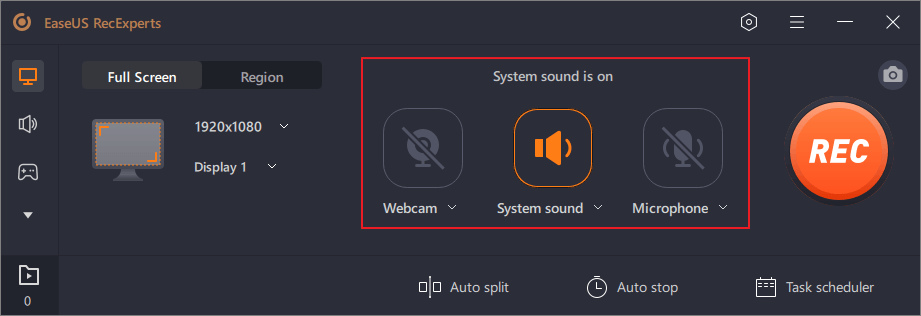
Step 3.If you need to pause the recording, click on the white double vertical bar. To end the recording, click on the red square sign. You can also use the hotkeys"F10"and"F9"to pause or stop recording.
Step 4.After recording, you can view the meeting videos in the pop-up recording list.
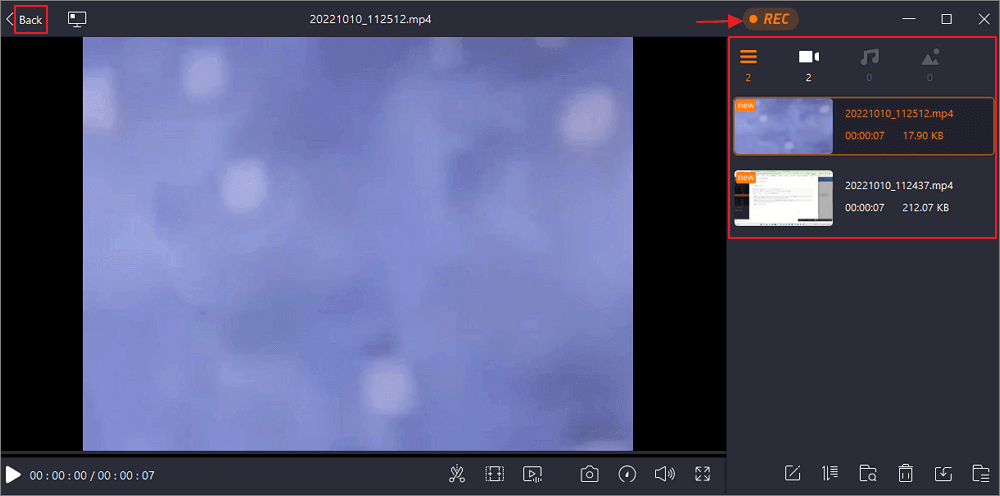
After simple steps, you can get a GoToMeeting video with audio. Then, check essential points in it.
Capture GoToMeeting on Mobile with Default Tools
To capture it on iPhone/iPad or Android, you can complete the work without downloading any third-party application. In this part, look at the related method based on your Mobile type.
Record GoToMeeting on iPhone/iPad
The iOS screen tool can do the job perfectly. Most iOS users choose this method as it's very easy and fast. Apart from GoToMeeting, you also can use it to capture streaming video, calls, or other activities on your iOS devices. To find where is your default application, follow the guide below. Here is the function interface.
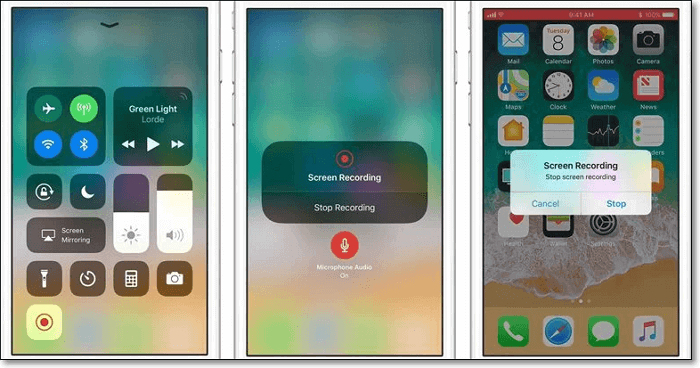
Here is a list of steps on GoToMeeting video recording on your iPhone or iPad:
Step 1.Choose "Settings" to tap the "Control Center". Then, hit the "Customize Controls" button. Next, tap the "+" icon next to "Screen Recording".
Step 2.Open GoToMeeting and tap "Join a Meeting". Followed, type the meeting ID and click "Join".
Step 3.从屏幕底部的滑动,挖掘capturing icon to start the mission. To stop it, hit the capturing button. Then, find the recorded GoToMeeting in "Photo".
Record GoToMeeting on Android
Also, you can apply GoToMeeting on Android. It's a practical online conference and meeting tool to help in the business-critical discussion. However, as a mobile application that can be removed anywhere, you may miss essential points when having online discussions. To capture every key point, make it a recorded video.
You can use the Android built-in tool for recording GoToMeeting webinars and almost every Android device has it. Check your device and search for this tool. Also, follow the guide below to use it functionally.
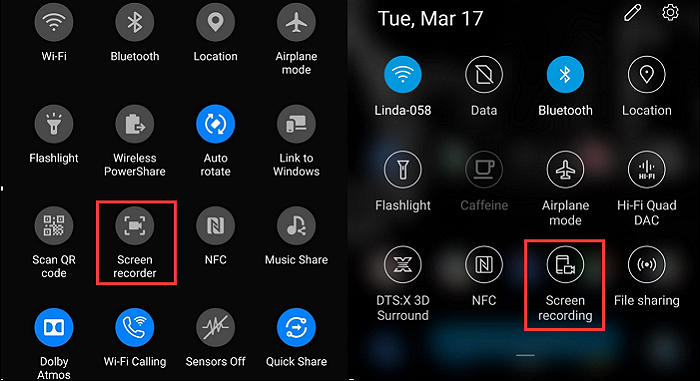
The steps below guide you through the GoToMeeting capturing process using Android:
Step 1.First of all, find the default tool by using the "Developer Options". If you cannot find it, open "Settings" and search for "System".
Step 2.Now, scroll down the menu to select "About Phone". Choose "Build" for inserting "Developer Options". After that, back to the developer and choose "Feature Flags". Then, adding the built-in application.
Step 3.Start capturing while performing the GoToMeeting. Meanwhile, you can use Android's defaultscreenshot toolto take a snap. Once you finish the mission, find the video in "Images".
The Bottom Line
GoToMeeting recording is not a tough task since you can complete the work in the reliable ways mentioned above. For desktop users, EaseUS RecExperts is the best choice as it has many fantastic functions when capturing. Besides dealing with GoToMeeting, use it to capture lectures, podcasts, or other activities on your screen with a few simple clicks. Catch this chance to have this powerful screen recorder!
FAQs About Recording GoToMeeting
下面是收集的常见问题the public, including can you capture GoToMeeting as an attendee and where is GoToMeeting capturing. If you have the same doubts, check with that.
1. Can you record a GoToMeeting if you are not the presenter?
Yes. Now you can easily grab GoToMeeting sessions and webinars as an Attendee for future reference. The video includes the audio portion of your session, show all activity that appears on the screen during the session, and any file sharing done by participants. Thus, check this tutoiral on how to record GoToMeeting not organizer.
2. Where is the GoToMeeting recording stored?
Generally, it provides you with two ways to find your recorded GoToMeeting. Based on how you set the stored place, you can search for it in the cloud or the local file. When you store it in the cloud, you can view it on the Meeting History page. If you save the video in the local file, the video is in C:\Users\Documents on computer. Also, you can change the default location.
3. How do I record a GoToWebinar session?
You can capture a GoToWebinar session with some powerful tools, like EaseUS RecExperts, OBS Studio, ShareX, etc. You can go to part 2 to learn how to capture it using EaseUS RecExperts.
EaseUS RecExperts

One-click to capture anything on screen!
No Time Limit, No watermark
Start Recording
