How to Fix Print Screen Button Not Working in Windows 10/11
| Workable Solutions | Step-by-step Troubleshooting |
|---|---|
| Fix 1.Restart Your Computer | Just click the Windows icon on your desktop, and select...Full steps |
| Fix 2.Check if the Print Screen Key is Enabled | Hit the F Mode key or F Lock key on your keyboard. Next, check...Full steps |
| Fix 3.Use a Hotkey Combination | Press Alt + PrtScn to screenshot the currently selected window...Full steps |
| Fix 4.Stop Background Programs | 同时按Ctrl + Shift + Esc键board...Full steps |
| Fix 5.Update Keyboard Driver | Press Win + X keys, and then click on the Device Manager option...Full steps |
| Fix 6.Try EaseUS ScreenShot | Launch this program, and click to Full Screen or Region to select...Full steps |
For Windows users, it is just a piece of cake to take screenshots immediately with the help of the Windows key and Print Screen button. But sometimes, you may encounter the Print Screen button not working when capturing your screen, so how to deal with this issue?
Now let's stick to this topic and find out the solutions to fix the Print Screen button not working on your Windows 10 or 11 PC quickly. Or you can directly try professional screencast software likeEaseUS ScreenShot.
EaseUS ScreenShot
- One-click to take full or partial screenshots
- Provide editing tools to enhance the captured image
- Copy the screenshot to the clipboard directly for later use
- Pin the screenshots on your desktop with simple clicks
Fix 1. Restart Your Computer
Usually, a restart might be all Windows needed to get back on track. So, if some buttons are not working on your keyboard, you can restart your computer and check whether the print screen button not working is resolved or not.
Just click the Windows icon on your desktop, and select the "Restart" button.

Fix 2. Check if the Print Screen Key is Enabled
Sometimes, you may disable the Print Screen function accidentally and you cannot take screenshots successfully with this feature. So you'd better check if the Print Screen key is enabled.
Just hit the F Mode key or F Lock key on your keyboard. Next, check if Print Screen works. (If there are no such buttons on your keyboard, you can skip this solution and go for another one)
Fix 3. Use a Hotkey Combination
Besides the Print Screen button, you also can press other keys for taking snapshots on your Windows 10 or 11 computer. Here are some examples:
- Press Alt + PrtScn to screenshot the currently selected window
- Hit Windows logo + PrtScn to take capture your desktop, and the screenshot will be saved in the "Screenshots" folder on your computer
- In addition, if you are using a laptop, you can click Fn + Windows logo + PrtScn keys on your keyboard
Fix 4. Stop Background Programs
Some background programs may cause the Print Screen button not working, including Snippet, OneDrive, Dropbox, etc. So to be able to stop this from happening, you need to close these background programs by checking the following steps:
Step 1.同时按Ctrl + Shift + Esc键board to open the Task Manager window.

Step 2.Find the program that you want to close, and then right-click on it to choose the "End Task" option.
Once done, press Print Screen to check if it can work or not.
Fix 5. Update Keyboard Driver
Similar to your system, your keyboard driver may become outdated, corrupted, or incorrect as well. And that will cause the Print Screen not working on your Windows PC. So, in this case, you should update the keyboard driver like below:
Step 1.Press Win + X keys, and then click on the Device Manager option.
Step 2.Click the arrow to expand the keyboards. Next, right-click on Standard PS/2 Keyboard and select the "Update Driver" button.

Step 3.Select "Search automatically for updated drive software" and it will automatically install the latest driver.
After that, check if your Print Screen button is working.
Fix 6. Try EaseUS ScreenShot
If all the solutions mentioned above cannot solve this problem, you can try an easy yet powerful free screen capture software:EaseUS ScreenShot.
This is an easy-to-use software, which functions in taking snapshots. With its help, you can freely choose to take a full or partial screenshot with one click, or even screenshot dual monitors. Once you capture the image, you can save it or directly copy it to the clipboard for later use. More than that, you can even enhance the screenshots by adding texts, mosaic, numbers, and many more as you like. Last but not least, it is completely free! Now, hit the below button to get this free screen capture software.
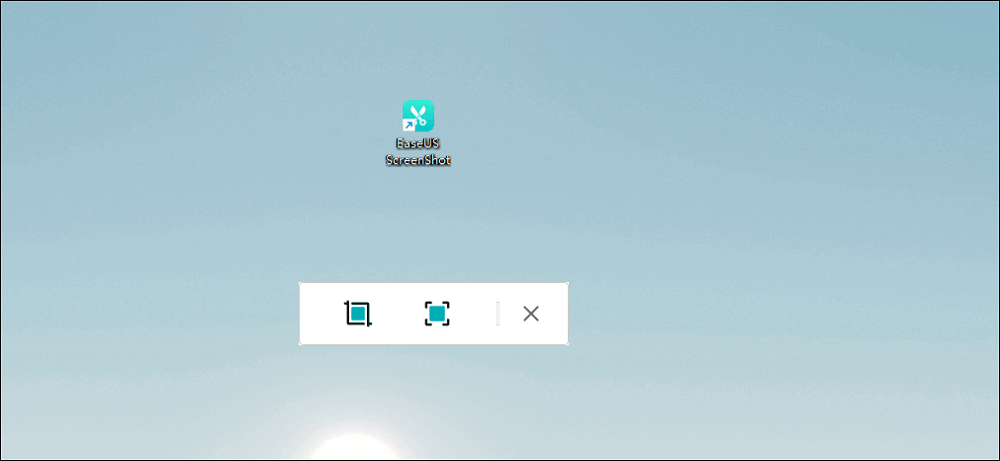
Step 1.Download and install EaseUS Screenshot on your PC, then launch it.

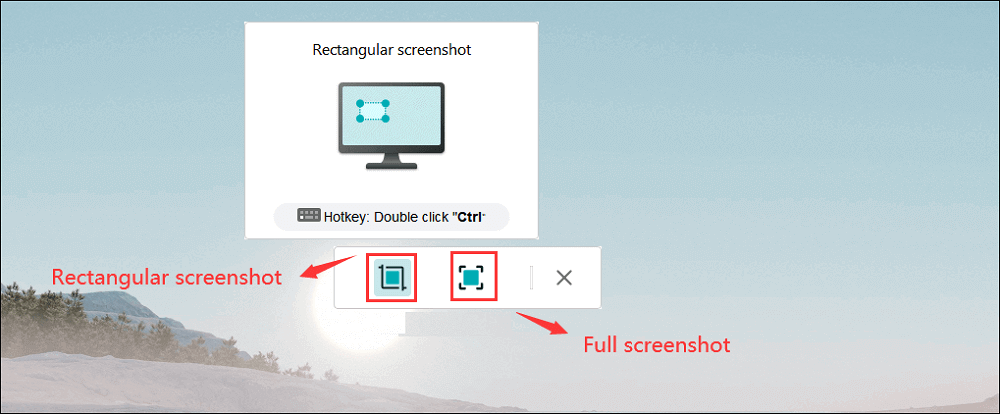
Step 2.You will see two options on the toolbar. The left one is for "Rectangular screenshot", and the right one is for "Full screenshot".
To take a partial screenshot, you just click on the left button (or double click the "Ctrl" key), then drag your mouse to select the area on your screen; To take a full screenshot, you can click the right button (or double click "Alt" on keyboard).

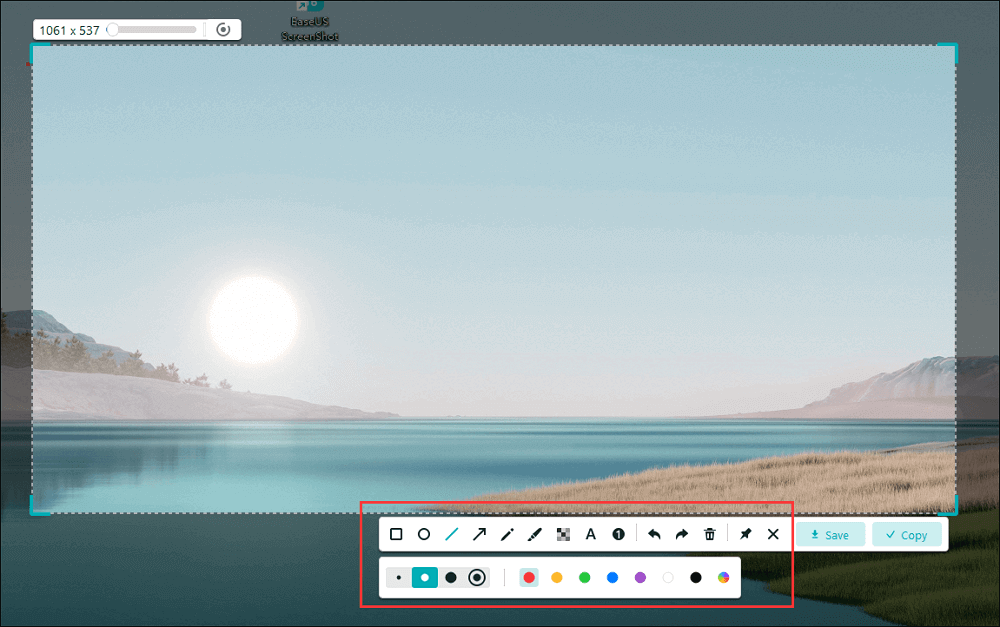
Step 3.When the screen is captured, you can see an editing toolbar below the screenshot. It provides a set of tools to modify the screenshot by drawing, adding text, mosaic, etc.

Step 4.Once done, click the "Save" button or press "Space" to save the screenshot. Or, you can click "Copy" or hit the "Enter" key to copy the screenshot to the clipboard.
Final Words
On this page, we provide 6 solutions to help you fix the Print Screen button not working on your Windows PC. You can pick any workable way to solve your problem. We hope this post can really help you!
Was This Page Helpful?


