-
![]()
Daisy
Daisy is the Senior editor of the writing team for EaseUS. She has been working in EaseUS for over ten years, starting from a technical writer to a team leader of the content group. As a professional author for over 10 years, she writes a lot to help people overcome their tech troubles.…Read full bio -
Jane is an experienced editor for EaseUS focused on tech blog writing. Familiar with all kinds of video editing and screen recording software on the market, she specializes in composing posts about recording and editing videos. All the topics she chooses …Read full bio
-
![]()
Crystal Chen
Crystal Chen is very interested in technology products. Experiencing many technological applications, She is willing to solve users' problems through writing tech-related articles. Through her words, you can find various solutions to solve one issue. …Read full bio -
![]()
Melissa Lee
Melissa is a sophisticated editor for EaseUS in tech blog writing. She is proficient in writing articles related to multimedia tools including screen recording, video editing, and PDF file conversion. Also, she's starting to write blogs about data security, including articles about data recovery, disk partitioning, data backup, etc.…Read full bio -
Jean has been working as a professional website editor for quite a long time. Her articles focus on topics of computer backup, data security tips, data recovery, and disk partitioning. Also, she writes many guides and tutorials on PC hardware & software troubleshooting. She keeps two lovely parrots and likes making vlogs of pets. With experience in video recording and video editing, she starts writing blogs on multimedia topics now.…Read full bio
-
![]()
Jerry
Jerry is a fan of science and technology, aiming to make readers' tech life easy and enjoyable. He loves exploring new technologies and writing technical how-to tips. All the topics he chooses aim to offer users more instructive information.…Read full bio -
Larissa has rich experience in writing technical articles. After joining EaseUS, she frantically learned about data recovery, disk partitioning, data backup, screen recorder, disk clone, and other related knowledge. Now she is able to master the relevant content proficiently and write effective step-by-step guides on various computer issues.…Read full bio
-
![]()
Rel
Rel has always maintained a strong curiosity about the computer field and is committed to the research of the most efficient and practical computer problem solutions.…Read full bio -
![]()
Gemma
Gemma is member of EaseUS team and has been committed to creating valuable content in fields about file recovery, partition management, and data backup etc. for many years. She loves to help users solve various types of computer related issues.…Read full bio
Page Table of Contents
Larissa
Updated on Mar 10, 2023
0Views|0min read
In this guide, you'll learn:
- Tip 1. Screen Record on Mac with Camera & Audio via EaseUS RecExperts (Best Pick)
- Tip 2. Screen Record on Mac with Camera & Audio via QuickTime
- Tip 3. Screen Record on Mac with Camera & Audio via OBS Studio
- A Comparison of Three Ways: Pros & Cons
- Screen Record on Mac with Camera FAQs
Simultaneously recording computer screens, front cameras, and microphone audio has become a popular way of video production. It is especially helpful if you want to create a tutorial to explain a certain process or concept, comment on gameplay, demonstrate andrecord a gameplay process on PC, or an online presentation, etc. No matter for what purpose, screen record with a camera and audio is a great way to achieve that.
"I have a Mac Book Pro with macOS Sierra installed. I would like to know which solution I could use to record my screen (I know I can make that with QuickTime Player) and, at the same time, record my webcam to have a video with the screen in the background and in a frame in the corner the webcam recording.
Thanks for your help and your answers."
- question from Reddit
Do you have the same confusion as the above question mentioned? Of course, when it comes to recording screens with camera and audio, the first thought that comes to most Mac users will be the QuickTime Player.
Actually, there are various tools with the feature to record screen and camera simultaneously on Macbook apart from QuickTime Player. This guide covers the other two methods except for the QuickTime Player, including EaseUS RecExperts and OBS Studio. Keep reading and find one that you like.
Tip 1. Screen Record on Mac with Camera & Audio via EaseUS RecExperts (Best Pick)
EaseUS RecExperts for Mac is a professionalMac screen recorderwith multiple video capturing and editing features. It combines the functions of particle &full screen recording, webcam real-time capturing, microphone & system sound recording, etc.
It allows you to record screens with camera and audio simultaneously with HD quality and save these recordings in more than ten formats. You can also set ascheduled recording, which will perform multiple recording tasks automatically at a specific time.
After recording, you can use the editing features, including trim, clip, merge, etc.
Another excellent point of EaseU RecExperts is that it offers a free screenshot feature, meaning you can capture any wonderful moment and save it as a picture.
Can't wait to try it? Download EaseUS RecExperts on your Macbook, and follow the steps below to record the screen with camera and audio.
Step 1.Launch this webcam recorder, and select the little webcam icon by clicking the down-arrow button on the left panel.
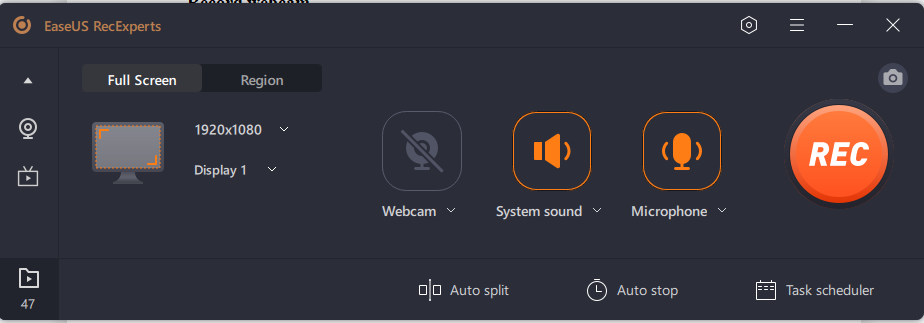
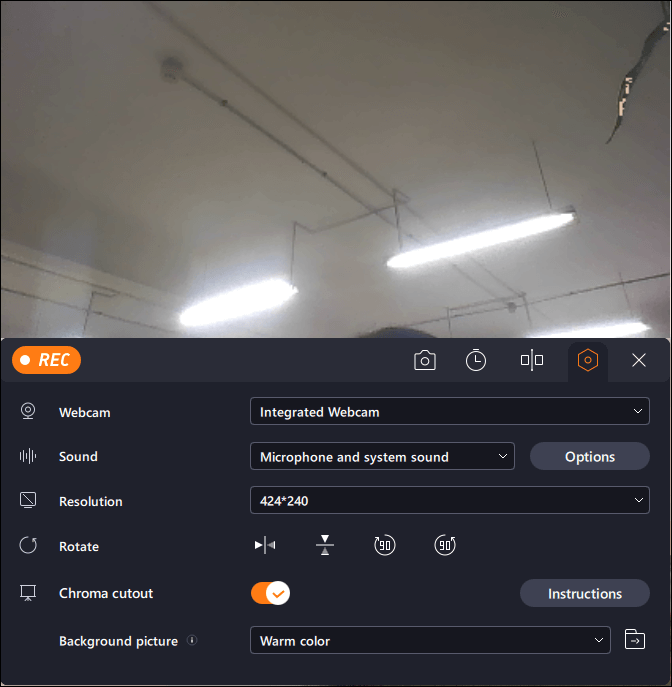
Step 2.If there is more than one camera device connected to your computer, you can freely choose your desired one. Besides, you can also select the audio source, adjust resolution and orientation, and even use the green screen effects if needed.
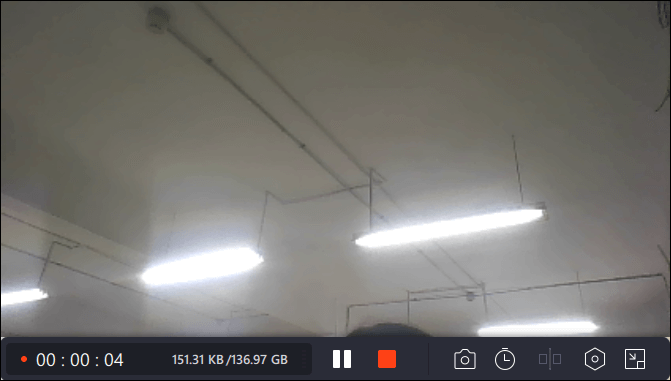
Step 3.You can click on the REC button when you are ready to start your webcam recording. During the process, you can choose to resize the recording window, take screenshots, pause or stop the recording flexibly. To end the recording, just click on the red square icon.
Step 4.Then, it will lead you to preview the recorded videos. Apart from that, you can enhance the recordings with some tools.
Tip 2. Screen Record on Mac with Camera & Audio via QuickTime
QuickTime Player is a macOS built-in multimedia software. You can use it to record screens as well as webcam and sound at the same time without any software installation. With it, you cancreate a video to record game and faceat the same time with ease.
If you are familiar with QuickTime Player, things will get easy:
Step 1.Open your Mac computer and launch QuickTime Player.
Step 2.Click the "File" tab, and choose the "New Movie Recording" option. Then you'll see a small camera window that is used to record your face.

Step 3.Click the "View" tab, and choose "Flost on Top ", it will ensure the camera window will float on the top of the screen no matter what application you use.

Step 4.Click the "File" tab again, and choose "New Screen Recording".

Step 5.Select the region you need to record on the screen.
Step 6.单击下拉箭头旁边的矩形按钮,nd choose the audio source for the camera and screen.
步骤7。Click the Record button to start. It will begin to record your screen with the camera as well as audio at the same time.
Tip 3. Screen Record on Mac with Camera & Audio via OBS Studio
OBS Studio is an open-source, free screen recorder mainly used for video capturing and live streaming. It offers a professional video-recording interface and allows users to record any application screen.
Compatible with Windows, macOS, and Linux systems, OBS Studio supports recording screens with camera and audio at the same time on any system device.
Using OBS to record screens with a camera, you are supposed to prepare an external camera and connect it to your computer. Make sure it is connected and recognized correctly.
Now follow the steps below to record the screen on Mac with camera and sound.
Step 1.Install and launch OBS Studio on your Macbook.
Step 2.连接一个凸轮a to the Macbook.
Step 3.Click the "+" icon under the Source tab, and choose the "Video Capture Device" option. Then you can see a camera window floating on the screen.

Step 4.Click "Settings" on the bottom-right corner, and navigate to the "Audio" option.

Step 5.Select the audio source as the Microphone or desktop sound, then click OK to continue.
Step 6.Click the "Start Recording" button in the bottom-right corner. OBS will begin to screen record with camera and audio.

A Comparison of Three Ways: Pros & Cons
We've made a comparison of the three tools in the aspect of their advantages and disadvantages.
It would be great if you applied one of the methods we mentioned above torecord screen with cameraand audio on your Macbook. If not, the following comparison would be helpful in deciding which screen recorder you use:
| Comparison | Pros | Cons |
|---|---|---|
| EaseUS RecExperts |
|
|
| QuickTime Player |
|
|
| OBS Studio |
|
|
As you can see, EaseUS RecExperts for Mac takes advantage of the other two regarding scheduled recording, simple user interface, multiple video editing options, extracting audio from recordings, multiple video & audio output formats, etc.
We strongly recommend you download and try it. It will meet your screen recording needs and won't disappoint you.
Screen Record on Mac with Camera FAQs
1. How do I record my Mac screen with my webcam?
To record a Mac screen with a webcam, you need to decide which tool you use. EaseUS RecExperts, QuickTime Player, and OBS Studio are all available. You need to enable the webcam function is enabled while recording. You can refer to the specific steps we have shown in the post.
2. How do I record my screen with my face?
To record the screen with your face, you need to ensure the webcam feature is on. A good screen recorder, like EaseUS RecExperts, can help to make the process easy.
- Launch the app, and click the "Webcam" button.
- Select the camera device, and adjust the resolution and orientation.
- Click the "REC" button when you are prepared.
EaseUS RecExperts
One-click to capture anything on screen!
No Time Limit, No watermark
Start Recording


