Best OBS Settings for Streaming on Twitch [2022 Updated]
During playing video games, are there some moments that you want to share with others? Streaming on platforms like Twitch or YouTube is an excellent choice as it can help find more people with similar interests to you, and it allows you to interact with the audience in real-time.
When it comes to having a live stream, OBS Studio, also known as Open Broadcaster Software, is the go-to tool you should have. But not many people know how to use it due to its complex interface and professional features.
As the first step, configuring thebest OBS settings for streamingis what you have to do to ensure the video quality of your live stream. This post will tell you the best OBS stream settings, how to set them up, and offer you the method of streaming with OBS on Twitch.
| Page Content | Learn More |
|---|---|
| 1. Best Stream Settings for OBS Studio | Before starting a live stream, you should check this OBS settings guide...Details |
| 2. Stream with Best OBS Settings for Twitch | First, you need to launch OBS Studio, click on the "File" button...Full steps |
| 3. Record with OBS and EaseUS RecExperts | Open EaseUS RecExperts on your computer and click "Full Screen"....Full steps |
Open Broadcaster Software Best Settings for Output
Before starting a live stream, you should check this OBS settings guide to select the optimal video/audio bitrate and adjust other settings. It's not difficult to navigate to the settings window as you can directly choose the "Settings" option under the "Controls" tab, or you can click on the "File" button on the top toolbar and select the "Settings" option to open that window.
There are many tabs on your left side, and you should pay attention to one of them: "Output." Let's check the settings in this tab one by one.

1. Video Bitrate
As many people know, the video bitrate influences the video quality in many ways. Generally speaking, the higher video bitrate leads to better video quality. However, it's advisable to choose the video bitrate according to your upload speed, and an excessive video bitrate is merely a waste of bandwidth.
OBS Recommended Settings for Video Bitrate:
| Quality | Resolution | Video Bitrate |
|---|---|---|
| Ultra-High Definition | 4K | 8000 |
| High Definition | 1920x1080 (1080P) | 3000/3500 |
| High Definition | 1280 x 720 (720P) | 1800/2500 |
| Medium | 640 x 360 (360P) | 600/800 |
This table about video bitrate OBS can help you select the most suitable one for you. For instance, the best OBS streaming settings for 4K videos should be 8000, while the OBS bitrate for 1080P is 3000 or 5000.
2. Audio Bitrate
Similarly, the audio bitrate decides the audio quality in the live stream, and the higher audio bitrate can result in better audio quality. The audio is so vital in a live stream as it marks up 80% of the content. You can choose optimal OBS settings for audio, referring to the table below.
OBS Recommended Settings for Video Bitrate:
| Quality | Audio Bitrate |
|---|---|
| High Quality | 320 |
| High Quality | 256 |
| Medium | 128 |
3. Advanced Settings
For professional users, OBS also offers you a more sophisticated output mode, and you can activate it by selecting "Advanced" from the dropdown menu after "Output Mode." The options in this mode allow you to stream with multiple audio tracks, and you can even adjust the bitrate of each track precisely. Although most users may not need those options, they are beneficial for those who want a perfect live stream.

Whether you configure the settings in simple mode or advanced mode, the best settings for OBS streaming fit your PC's device performance and network speed. So, make the choices according to your situation.
How to Stream with Best OBS Settings for Twitch
How to stream with OBS after setting up those options for the output quality? To stream on Twitch with OBS Studio, you need to connect them in two ways: directly connecting your Twitch account to OBS or using the stream key.
This part will guide you through streaming with OBS on Twitch step by step, and you should pay attention to the OBS optimal settings that will be mentioned.
How to Stream with OBS Optimal Settings for Twitch:
Step 1.First, you need to launch OBS Studio, click on the "File" button on the top toolbar, and select the "Stream" tab. It allows you to directly choose "Twitch" from the dropdown menu of "Service."

Step 2.有一个“连接账户(推荐)”按钮。Click it and log in to your Twitch account. Binding an account is the most straightforward method to connect Twitch with OBS, but it's also possible to click on the "Use Stream Key" button and fill in the stream key offered by Twitch.

If you don't have one, click on "Get Stream Key," and it will turn to a page on which you can get the key.
Step 3.Now, you come into the second stage to adjust OBS Studio best settings for streaming. Back to the main interface of OBS, and hit the "+" icon in the "Source" section, and then select the video source for streaming.

Each option in this menu fit a different streaming situation:
- Display Capture:Capture the whole display except for a game in the full-screen mode.
- Game Capture:Capture a video game in full-screen mode.
- Window Capture:Capture the active window of the application that is running.
Step 4.在选择合适的视频源treaming, click on "Start Streaming" to have a live stream on Twitch.

How to Record Streaming with OBS and EaseUS RecExperts
你会怎么做如果你想记录你押尾学e streams on Twitch? Two powerful applications are available, the first one is OBS Studio, and the other is EaseUS RecExperts.
1. Record Live Stream on Twitch with OBS Studio
Besides streaming, recording your screen is also one of the critical features of OBS Studio. The screen recorder supports high-quality video and audio capturing in real-time, and the customized hotkeys enable you to switch from many different scenes. Despite the complex audio sources, the powerful built-in intuitive audio mixer can make them sound harmonious. Nevertheless, you can only select from one of the two, and this software doesn't allow you to utilize those two functions simultaneously.
Detailed Steps:>>How to Record Screen with OBS
This post will walk you through recording streaming with OBS. Click to get more information.

2. Record Live Stream on Twitch with EaseUS RecExperts
As mentioned above, one of the shortcomings of OBS is its complex interface and confusing options, and all those features make it not so appropriate for beginners. What if you want to record a live stream on Twitch, but you don't have professional skills in using the screen recorder? The best solution is to get a more intuitive and user-friendlyscreen recording software, such as EaseUS RecExperts.
This versatile recorder supports recording streaming video and audio on your Windows PC and MacBook with simple clicks. One of its merits is the ability to select the recording region freely, and it enables you to capture the whole screen or merely a part of it. What's more, it allows you to set scheduled recording tasks to start the recording automatically.
Features:
- Astreaming video recorderon Windows and Mac
- Record video, audio, and webcam simultaneously
- Support more than ten output formats
- Offer default editing tools for recordings
This software requires no registration. Click on the button below forfree downloadnow.
How to Record Live Stream on Twitch with EaseUS RecExperts:
Follow those steps to record whatever is on your screen now.
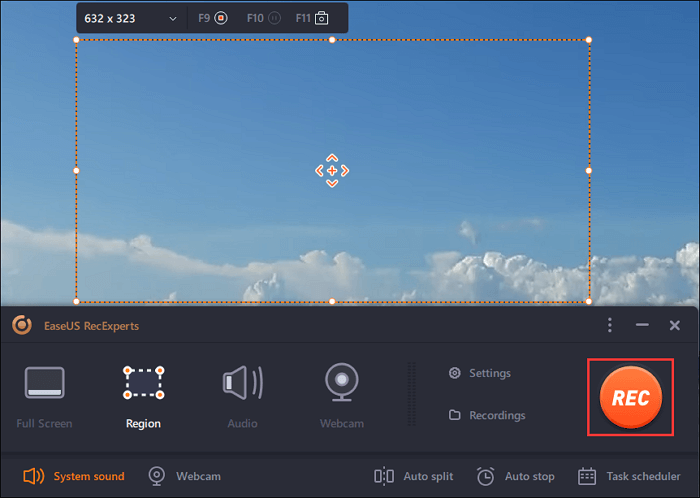
Step 1. Configure the Screen Recording Options
Open EaseUS RecExperts on your computer and click "Full Screen" or "Region" to choose the area on your screen that you want to capture. Then select an audio source by clicking the Sound icon at the bottom left of the panel. If needed, click the "Webcam" icon at the bottom to add an overlay of your webcam footage to your screencast.

If you want to split the recorded file after recording, click "Auto split", and then your recording files will be split automatically according to file size or recording time that you have set.
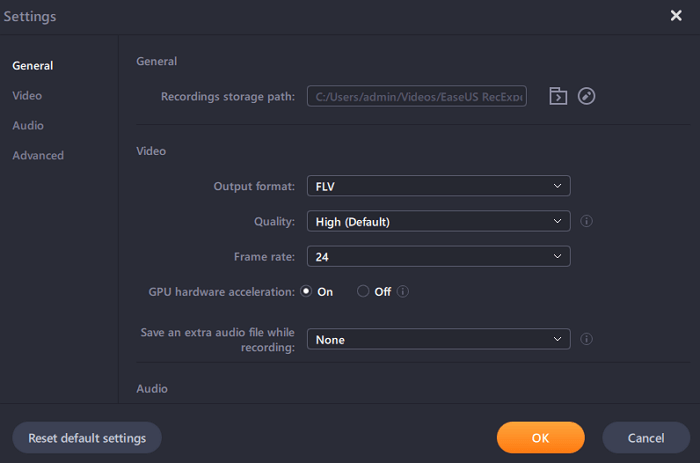
Step 2. Specify Recording Settings
Once you have configured the basic recording options, you might want to configure the advanced settings.
Click "Settings" to open the menu. On the following menu, select a format for your screencast and specify other options as you feel appropriate. Then click "OK" at the bottom to save your settings.

Step 3. Start and Stop Making a Recording
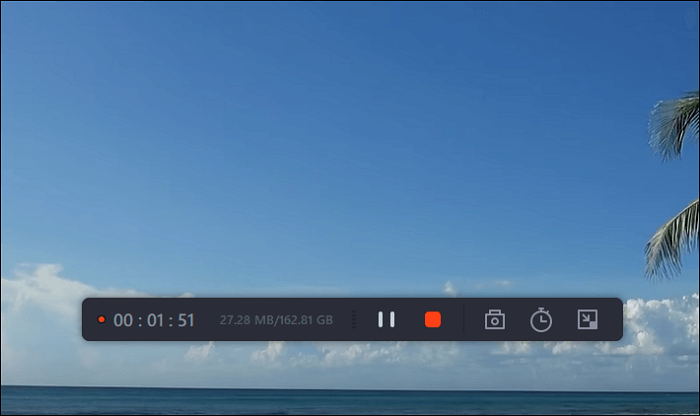
You should now be back to the main interface. Open up the screen that you want to capture, and then click "REC" in the software. Then it will start recording everything that is displayed on your screen.

Then you will see the toolbar where you can pause or stop the recording, take screenshots while recording, or set a specific time to stop the recording.

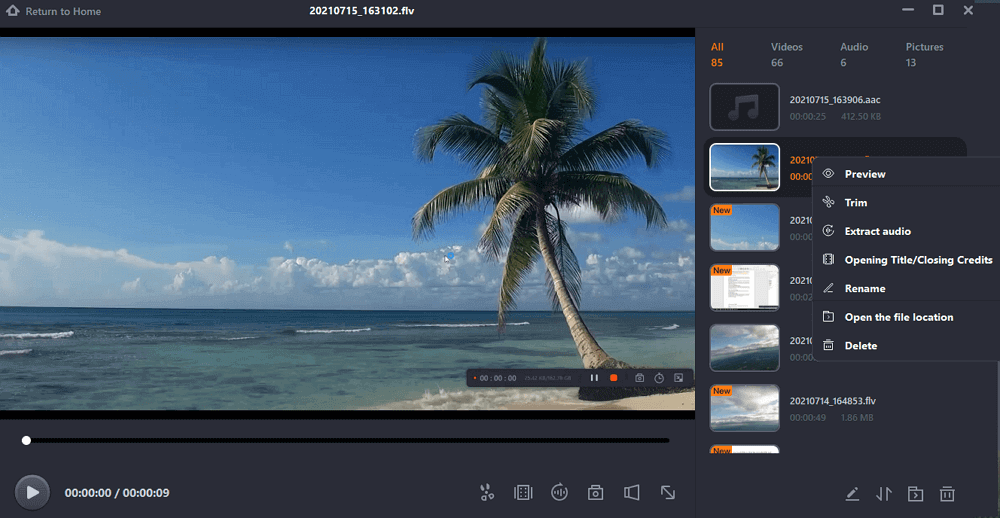
Step 4. View All Your Recordings
Once the recording is done, this software keeps all your recordings at a single location for you to view. You can preview and edit the recorded file here.

Conclusion
This post answered the question: what are thebest OBS settings for streaming. In addition to that, it offered you detailed steps to stream with the best OBS settings for Twitch.
In the end, this post even teaches you how to record the streams on Twitch with two great recorders: OBS and EaseUS RecExperts. If you are a professional user, the OBS Studio can be an excellent choice for you as it can configure the settings flexibly. If you are a beginner, EaseUS RecExperts is the most easy-to-use recorder for you.
Was This Page Helpful?
About the Author
Melissa is a sophisticated editor for EaseUS in tech blog writing. She is proficient in writing articles related to screen recording, video editing, and PDF file converting.

