Applies To: iMac, MacBook, iPhone X, iPhone 8/8 Plus, iPhone 7/7 Plus, iPhone 6/6s, iPhone 5/5s
Have captured some amazing photos with your iPhone and want to save a copy of them on your Mac? Or you want to copy photos from iPhone to Mac to free up space on your iPhone? No worry, this article will introduceFIVEfree methods to import photos from iPhone to Mac, no matter it's MacBook or iMac. You can transfer your iPhone photos to Mac with the free software installed or get iPhone photos to Mac wirelessly with the built-in features on your devices.
Before you choose the method you prefer, you may needa general comparison between these methods.
- Part 1: Transfer photos from iPhone to Mac with software
- Method 1: Use the freeware for data transfer--EaseUS MobiMover
- Method 2: Use the Photos App
- Part 2: Copy photos from iPhone to Mac wirelessly
- Method 1: Use AirDrop
- Method 2: Turn on iCloud Photo Stream/iCloud Photo Library
- Method 3: Sent photos via Email/iMessage
Part 1: How to transfer photos from iPhone to Mac with freeware
EaseUS MobiMover
A Brief Introduction to MobiMover
 A Tool for Data Transfer
EaseUS MobiMover Free是一个值得信赖的iOS数据传输工具。与手机域名Mover installed on your computer running macOS or Windows, you can freely share data between your iOS devices (iPhone/iPad in iOS 8 and later) or between an iOS device and a computer. In addition to photos, other file types, includingvideos, music, ringtones, voice memos, contacts, messages, and more, are also transferable using MobiMover. Thus, you can also transfer photos from Mac to iPhone via MobiMover if you need to.
 A File Manager
It's quite common for you to manage your iPhone or iPad content. Luckily, MobiMover provides you a more convenient way to help you manage your iDevice files from the computer, either by deleting, editing, or adding items.
 A Video Downloader
What's surprising with MobiMover is that the tool can also serve as a free video downloader, which enables you to get videos fromYouTube, Vimeo,Instagram, Twitter, Facebook, MySpace, and other video sitesto your computer or iPhone/iPad. For example, you can easilydownload YouTube videos to your Macvia the video download feature.
Perfect tool, right? Now, it's time for you to try MobiMover to transfer your iPhone photos to Mac. You can apply the similar way tocopy videos from your iPhone to Mac.
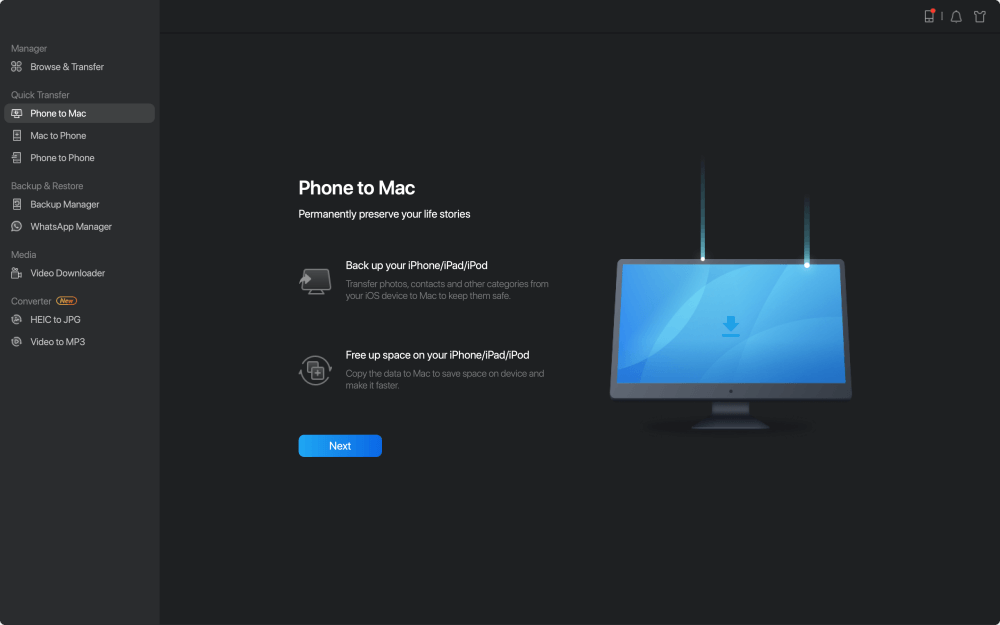
Step 1.Connect your iPhone to Mac with a USB cable. Run EaseUS MobiMover, choose "Phone to Mac" and click the "Next" button to continue.
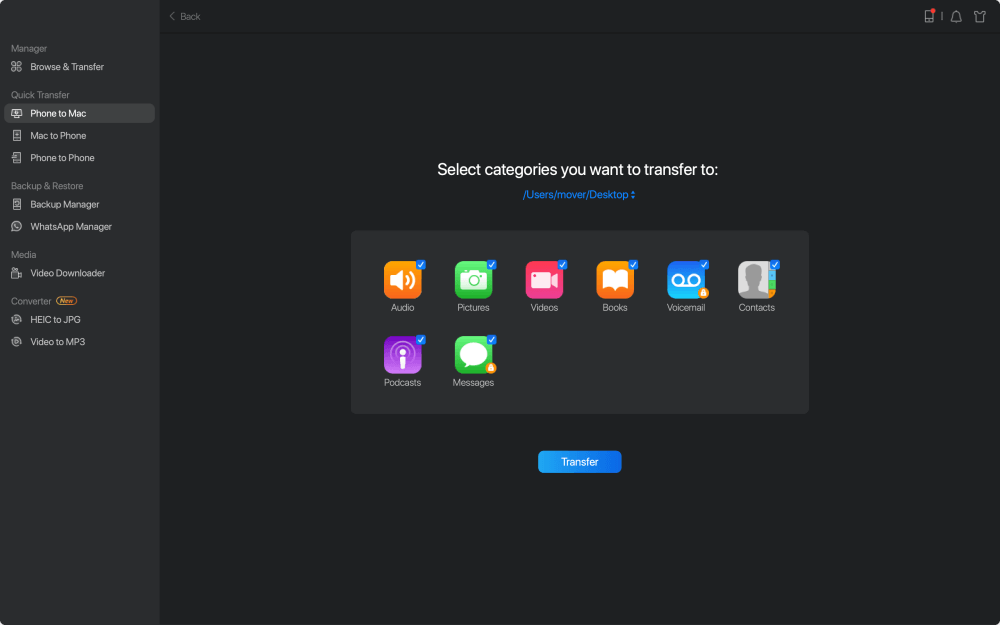
Step 2.Check the category/categories you want to copy from your iPhone to Mac. As you can see, you can copy other supported files together with photos from your iPhone to Mac all at once. After that, don't forget to customize the storage path for the exported photos unless you want to save them on your desktop.
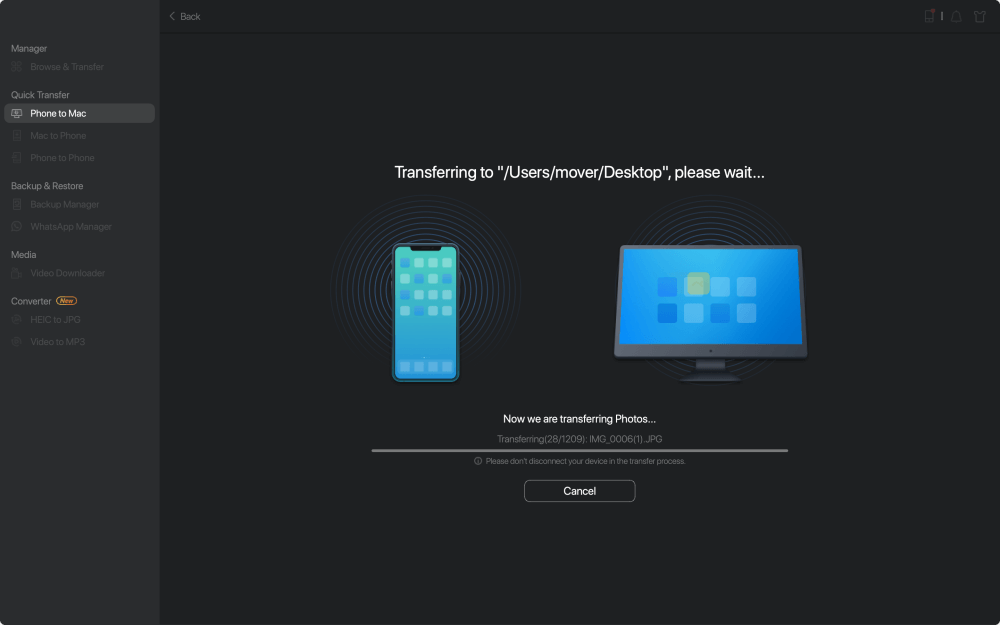
Step 3.Now, click the "Transfer" button to start transferring photos or other files from your iPhone to Mac without iTunes. Exporting files from iPhone to Mac with MobiMover is the right way for backup to avoid unexpected data loss.
Photos App
If your Mac is on OS X Yosemite v10.10.3 or later, there is an App calledPhotos, which replaced the iPhoto and Aperture in the earlier versions. As you may know, Photos App is also useful for importing photos from iPhone to Mac. Before you start, you need to make sure that you have the latest version of iTunes on your Mac.
Step 1: Connect your iPhone to Mac. If asked, enter the passcode of your iPhone and clickTrustin the prompt on your iPhone asking you to Trust This Computer.
Step 2: RunPhotosif it doesn't open automatically.
Step 3: Make sure the Photos App shows theImportscreen, on which you can see all the photos and videos on your iPhone.
Step 4: Select the pictures you want to copy and clickImport Selectedor tapImport All New Photosto transfer all new photos from your iPhone to Mac.

Part 2: How to copy photos from iPhone to Mac wirelessly
AirDrop
The first method recommended for you to transfer photos from iPhone to Mac wirelessly is to use AirDrop. With AirDrop, the built-in feature on Mac, iPhone, iPad and iPod Touch, you can send files like photos, contacts, websites and more from one AirDrop-supported device to another. For example, you can alsoAirDrop contacts from iPhone to iPhone. It's no doubt that you can transfer photos from iPhone to Mac with AirDrop.
Step 1: Turn on AirDrop on your Mac.
- Go toFinder>Go>AirDropand switch onBluetoothandWiFito turn on AirDrop on your Mac.
- Set the optionAllow to be discovered byasEveryoneorContacts Only.
Step 2: Turn on AirDrop on iPhone.
- Swipe up from the bottom of your iPhone screen to openControl Center.
- Press deeply on the module where Airplane Mode locates in, tap onAirDropand set your iPhone to be discovered byContacts OnlyorEveryone.
Step 3: Once the Mac and the iPhone are connected. You can start to transfer photos from iPhone to Mac as you like.
- Go toPhotosApp on your iPhone.
- Select the photos you'd like to send from your iPhone to Mac and click theShare button.
- Choose AirDrop and select your Mac.

iCloud Photo Stream/iCloud Photo Library
通过打开iCloud照片流或iCloud的照片Library, your iPhone photos will be automatically synced to your other Apple devices that use the same Apple ID when connected to Wi-Fi. The difference between iCloud Photo Stream and iCloud Photo Library is that, with My Photo Stream, your iPhone photos will show on your Mac for just 30 days, and the limit is 1,000 photos. Thus, if you use My Photo Stream to transfer photos from iPhone to Mac, do remember to download iCloud photos to Mac in Photos App within 30 days.
How to turn on iCloud Photo Stream/iCloud Photo Library:
- On your iPhone: Go to Settings > [your name] > iCloud > Photos, then turn on iCloud Photos Library or My Photo Stream.
- On your Mac: To turn on iCloud Photo Library, go to System Preferences > iCloud > Options next to Photos, then select iCloud Photo Library. To switch on My Photo Stream, open Photos and click on Photos > Preferences > iCloud. Then select My Photo Stream and turn it on.
Email/Message
If you just want to import several pictures from your iPhone to Mac, using Email or iMessage to transfer photos between computer and iPhone is also a good choice. To send photos from your iPhone to Mac using Email or iMessage, you need to:
Step 1: Open the origin Album inPhotosApp.
Step 2: Click onSelectand pick up the photos you want to transfer.
Step 3: Tap the Upload icon and ChooseMail/Message.
Step 4: Type in the information needed to send anEmail/iMessage.
Step 5: Check the Email/iMessage on your Mac and download the photos and save them on your Mac.
With Email, you can also add the photos you want to upload from iPhone to Mac as an attachment to your Email that you can send to yourself.

Bottom Line:
A General Comparison between These Tips
EaseUS MobiMover: It's fast for the transfer of multiple items and multiple categories. Supports data transfer, file management, and video download.
Photos: No software installation, but you can just copy photos in your iPhone Camera Roll to Mac.
AirDrop: It's convenient. However, it may be slow for multiple photo transfer. The supported file types are quite limited.
iCloud Photo Stream/iCloud Photo Library: It's either space-limited or quantity-limited.
Email/iMessage: It's not suitable for multiple transfer.
Was This Page Helpful?
Daisy is the Senior editor of the writing team for EaseUS. She has been working in EaseUS for over ten years, starting from a technical writer to a team leader of the content group. As a professional author for over 10 years, she writes a lot to help people overcome their tech troubles.
Myra joined EaseUS in 2017. As a big fan of Apple products, she mainly focuses on iOS data transfer and iOS troubleshooting tips. Meanwhile, she is expanding her knowledge and skills in other fields like data recovery and disk management. Myra is open-minded and likes both extensive and intensive reading. Other than reading and writing, she is also fond of mobile games and K-pop stars.
Related Articles
How to Transfer Photos from iPhone to PC in Windows 10 in 4 Ways
![author icon]() Myra/Apr 19, 2023
Myra/Apr 19, 2023Top 6 Best YouTube MP3 Downloaders in 2023
![author icon]() Sofia Albert/Apr 18, 2023
Sofia Albert/Apr 18, 2023How to AirDrop Between Mac and iPad
![author icon]() Myra/Apr 18, 2023
Myra/Apr 18, 20233 Tips | How to Download Videos from Dailymotion
![author icon]() Myra/Apr 18, 2023
Myra/Apr 18, 2023

