一般来说,iPhone用户可以直transfer photos from iPhone to computer via USB. However, this method has a few problems to be ironed out. Sometimes,iPhone does not show up in File Explorer. Even if you can access the iPhone from your computer, photos don't show up in a coherent timeline. And the iPhone photo format (HEIC) is not supported by Windows. To view photos on your computer, you need toconvert HEIC to JPGfirst.
For these annoying reasons, you can select to transfer photos from iPhone to computer without USB cables. In this post, we will focus on it. Now let's explore how to transfer photos from iPhone to computer without USB.
How to Transfer Photos from iPhone to Computer Without USB
Apart from photo migration from iPhone to computer with USB (such as via File Explore and iTunes), a lot of tips can help you do that. In the following, we will introduce four efficient ways to transfer photos from iPhone to computer without USB easily.
1. iCloud
iCloud is an official cloud-based service launched by Apple Inc. in October 2011. It enables users to back up, transfer, manage, and restore data across devices. However, due to its 5GB of free storage offered, many users tend to use it to store essential photos and other files. You can alsouse iCloud to transfer photos from iPhone to Android.
Now let's see how to transfer photos from iPhone to computer via this powerful service:
Step 1.Go to Settings on your iPhone.
Step 2.Tap on [your name] > iCloud > Photos.
Step 3.Turn on the toggle of iCloud Photos to sync iPhone photos to iCloud now.

Step 4.Go toiCloud.comon your computer and sign in.
Step 5.Once you sign in, choose Photos.
Step 6.Then select the photos you want to download to your computer and then click Download.
Learn: "Fix iPhone Photos Not Syncing to iCloud" for more information if your iCloud is unable to back up your photos. In addition, if you have a Mac which supports AirDrop, you can use AirDrop to transfer data from your iPhone to your Mac.
2. Google Photos
When it comes to cloud-based services, Google has the largest share of the global market. Note that Google offers a total of 15 GB of free storage space for Google Photos, Google Drive, Gmail, and other Google services. So pay attention to the free space that's left to make sure there's enough for all the photos to be transferred.
To use Google Photos to transfer photos from iPhone to computer without USB, follow the steps below:
Step 1.Download and install Google Photos on your iPhone.
Step 2.Open Google Photos and sign in.
Step 3.Then go to Settings > Back up & sync.
Step 4.Turn on the toggle of Back up & sync.

Step 5.Then go tophotos.google.comon your computer.
Step 6.Sign in. Choose the photos you want to transfer and click Download to download them to your local computer.
3. Dropbox
As a file hosting service, Dropbox offers cloud storage, file synchronization, personal cloud, and client software. It is developed by Dropbox Inc. and released in Sep. 2008, a little earlier than iCloud and Google Photos. As a result, established Dropbox has relatively mature features compared to most cloud services these days. Note that you can only get 2 GB of free storage.
Here's how to transfer photos from iPhone to computer with Dropbox:
Step 1.Download and install Dropbox on your iPhone.
Step 2.Launch it. Tap the "+" at the bottom of the screen > Upload Photos.
Step 3.Once you select the photos, select Set location > Upload to sync photos to Dropbox.
Step 4.Then download Dropbox on your computer.
Step 5.Navigate to the photo folder and follow the on-screen instructions to download photos to your computer.

4. Email
You can also transfer photos across devices by emailing yourself. It is recommended to upload a small number of essential photos to transfer via Email since the data amounts have an impact on transfer time.
To transfer photos from iPhone to computer without USB by emailing yourself:
Step 1.Go to the Photos app on your iPhone.
Step 2.Select the photos that you want to transfer.
Step 3.Tap Share > Mail.
Step 4.Then you will complete the basic information of this email.
Step 5.When you're done, tap Send.
Step 6.Then you will be asked to select the file size you want to compress. After that, this email will be transferred right now.

Bonus: How to Transfer Photos from iPhone to Computer With EaseUS MobiMover
In this section, we will introduce a reliable iPhone photo manager -EaseUS MobiMover. It is designed totransfer files from iPhone to PCor vice versa. You can also use it totransfer data from one iPhone to another.
Apart from data transfer, EaseUS MobiMover is also an iPhone management solution. It enables users to back up, restore, and manage iPhone/iPad data with ease. And you can also use it to transfer and back up your WhatsApp chat history when you change to a new iPhone.
EaseUSreleased free and Pro versions. In terms of its free version, you can transfer data between a computer and iPhone/iPad for 20 files per day. If you aim to switch to a new iPhone, it's better to choose the Pro version which offers no limited data transfer per day.
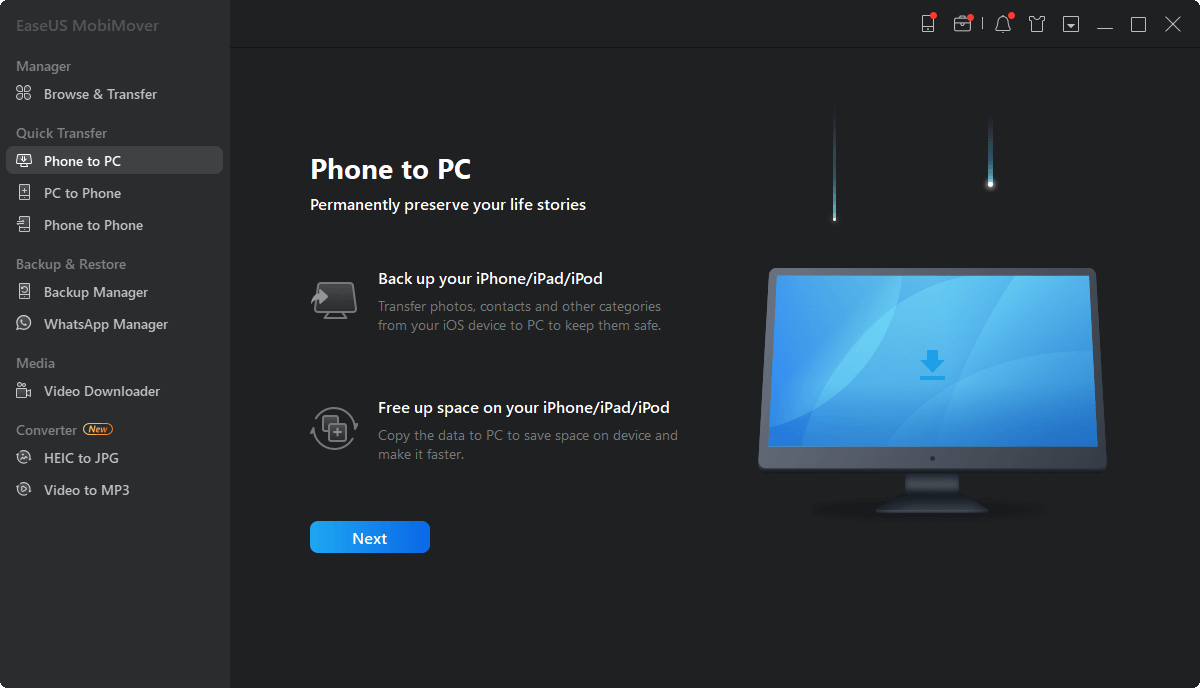
Step 1.Connect your iPhone to your computer running Windows 7 and later or Mac OS X 10.7 and later. Launch EaseUS MobiMover, choose "Phone to PC" on the main screen and click the "Next" button to move on.
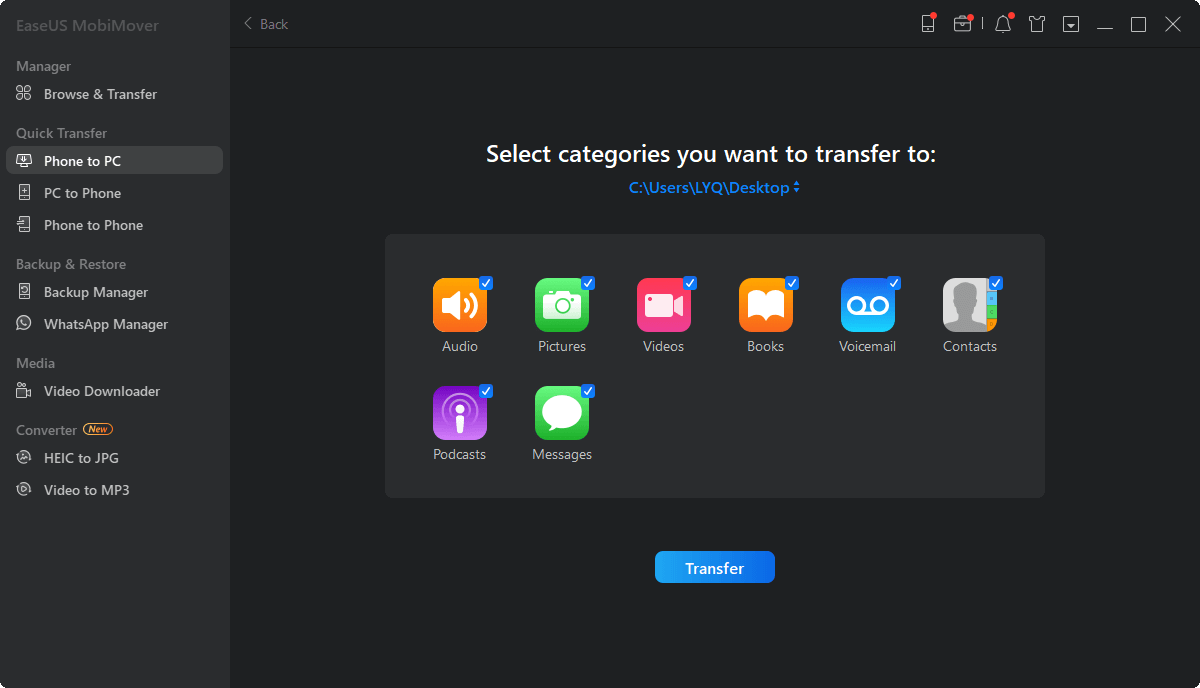
Step 2.选择“图片”范畴作为你想复制from your iPhone to your computer. It's the right choice for you to transfer other supported file types together with photos from your iPhone to the computer to make a backup.
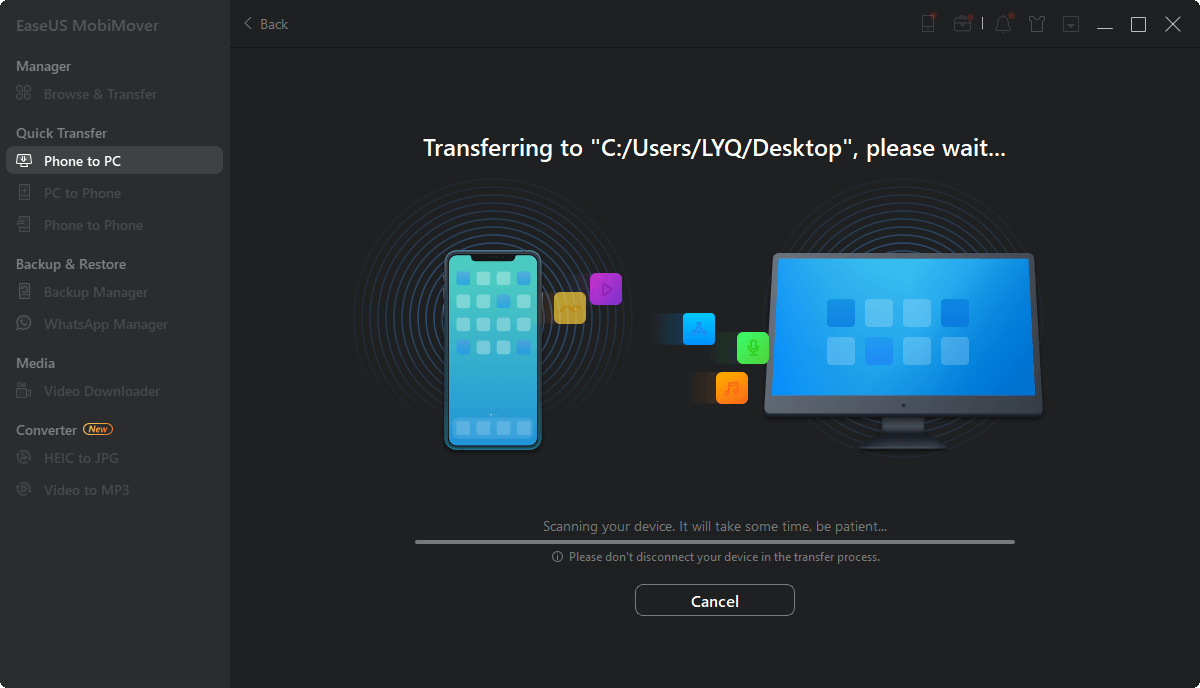
Step 3.Click the "Transfer" button to start transferring photos from your iPhone to the computer. Depending on the size of the files, it may take seconds or a while to import pictures from your iPhone to your computer. Wait patiently for the process to finish and check the items in the selected folder after that.
Conclusion
In this tutorial, we have explained five ways to help you transfer photos from iPhone to computer. If you are reluctant to use a USB cable to connect your iPhone to your computer, it is recommended to use iCloud. In addition, if you would like to transfer a large number of photos, EaseUS MobiMover is mostly suggested. You can alsotransfer photos from iPhone to flash driveif you want to save them separately.
FAQs on How to Transfer Photos from iPhone to Computer Without USB
Whatever you want to know about how to transfer photos from iPhone to computer without USB, our Frequently Asked Questions section has got you covered! We hope this section clears all the doubts and sets you free. Let's check FAQs now.
1. Is Dropbox not free anymore?
Dropbox offers 2GB of free storage space on the Basic plan. In contrast, it is more recommended to choose Google Drive to store files in the cloud. Google offers 15 GB of free storage which is enough for individuals.
2. Can I transfer photos from iPhone directly to PC?
You can transfer photos from your iPhone to your computer using a USB cable. But the photos stored on the iPhone are in HEIC format which is not supported by Windows.
3. Can I transfer data from one iPhone to another wirelessly?
Apple's Quick Start is the simplest way to wirelessly transfer data from iPhone to iPhone. You can also use EaseUS MobiMover mentioned above to help you.
Was This Page Helpful?
Daisy is the Senior editor of the writing team for EaseUS. She has been working in EaseUS for over ten years, starting from a technical writer to a team leader of the content group. As a professional author for over 10 years, she writes a lot to help people overcome their tech troubles.
Gorilla joined EaseUS in 2022. As a smartphone lover, she stays on top of Android unlocking skills and iOS troubleshooting tips. In addition, she also devotes herself to data recovery and transfer issues.
Related Articles
8 Ways to Connect Phone to Computer (iPhone & Android)
![author icon]() Myra/Apr 18, 2023
Myra/Apr 18, 2023How to Print HEIC Photos on Windows an Mac
![author icon]() Sofia Albert/Feb 22, 2023
Sofia Albert/Feb 22, 2023How to Convert and Download Dailymotion Videos to MP3 on Windows/Mac
![author icon]() Daisy/Apr 18, 2023
Daisy/Apr 18, 2023How to Transfer Photos from iPhone to Laptop Wirelessly [4 Ways]
![author icon]() Sofia Albert/Apr 18, 2023
Sofia Albert/Apr 18, 2023

