With Shared Albums in the Photos app, you can share photos and videos with your friends, family, or other devices over WiFi. As convenient as it is, iCloud Shared Album has become a popular way to share pictures. But sometimes, this feature may not work correctly due to some reasons listed below.
- There is something wrong with Apple System Status
- The iCloud photo link has expired
- There is no internet connection
- You're under Low Power Mode, which will force some functions to shut down
Whatever the reason is, you'll learn some feasible solutions in this guide.
One more thing: If you want to disable the iCloud Shared Album feature on your iPhone, you can refer to the steps listed in our final part.
Part 1. 7 Solutions to Fix the "Shared Albums Not Working" Issue
In this part, we will show you some simple solutions to fix the iCloud shared album not working on iPhone. If these solutions fail to help you out, you can directly jump to Part 2 to use an alternative way to share pictures.
1. Check if you've enabled the "iCloud Shared Albums" feature on your iPhone: Go to the Settings on your iPhone > iCloud > Photos > Shared Album.
2. Check your system status. To do this, you can go toApple System Statusto check if the service is down.
3. Check the network connection on your iPhone. If necessary, reset network settings by going to Settings > General > Transfer or Reset iPhone > Reset > Reset Network Settings.
4. Ensure the iCloud photo link hasn't expired. If it expired, it would prompt you with the "Failed to retrieve" message. In that case, you can go to use a new sharing link.
5. Disable and re-enable the Shared Albums feature by going to the Settings > [your profile] > iCloud > Photos > Shared, turn it off, and re-enable it.
6. Restart your iPhone or iPad. This will refresh your system and fix some small issues.
7. Update your iOS system to the latest version. Updating your iOS system will fix some bugs on your device.
Part 2. The Easiest and Quickest Way to Share Photos and Albums
Though the Shared Album is a great way to share photos with your friends or between different devices, it has some frustrating quirks/features, such as:
- It may take forever to load or add pictures to your library, no matter how many pictures it is
- The recipient needs to download the photos over WiFi
- It doesn't support Android devices
- It will compress the size and quality of your images or videos
所有这些特性使它令人沮丧的分享pictures via iCloud. If you want some recommendations for other services for transferring photos between different devices, try thisiPhone data transfersoftware - EaseUS MobiMover. This transfer tool lets you transfer photos or albums by date, place, people, and more without compressing their quality. The transfer speed is top-notch - moving a bunch of pictures will only take a few minutes to complete.
To transfer a non-compressed full picture from one iPhone/iPad to another or a computer, download this program on your computer and follow these steps to do it.
Step 1.Connect your iPhone or iPad to your Mac. Start EaseUS MobiMover and go to "Content Management" > "Pictures" > "Albums."

Step 2.Select the albums you'd like to copy from your iPhone/iPad to Mac. You can select specific items or select all, depending on your needs. You can choose "Original" and "JPG" as the format of the transferred photos in "Preference".
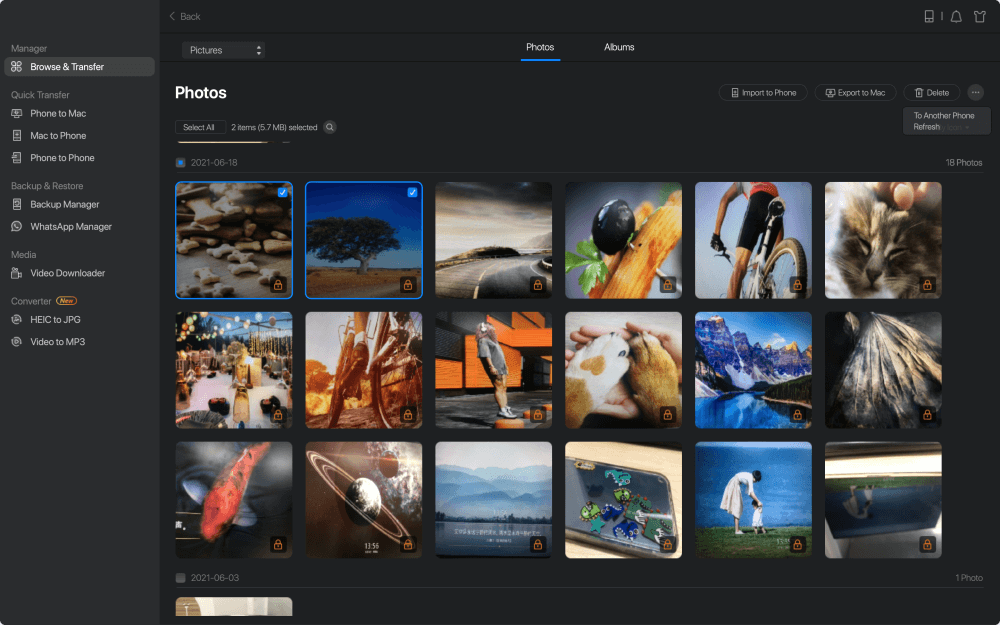
Step 3.Click the "Transfer" button, and MobiMover will start transferring albums from your iPhone or iPad to your Mac automatically. When it has completed, go to the destination to check the files.

In addition to transferring photos, EaseUS MobiMover is also capable of doing things like:
- Transfer, manage, export/import photos, messages, contacts, SMS, etc
- Transfer data from one iPhone/iPad to another
- Download videos from websites like YouTube, Facebook, Twitter, etc
- Convert HEIC images to JPGwith one-click
- Convert any local video to MP3
Part 3. How to Enable or Disable iCloud Shared Albums on iPhone
Considering that some of you may want to enable and disable Shared Albums on your iPhone, iPad, or iPod touch, we compile the steps.
Step 1. On your device, open the Settings app.
Step 2. Tap [your profile] > "iCloud" > "Photos, " enable or disable "Shared Albums."
Tips: If you want to know how to share photos with the Shared Album features, you can follow these steps:
- Open the Photos app on your iPhone and select the photos you wish to share.
- Tap the share icon and tap "Copy iCloud Link."
- Paste the link to your Message app and choose a friend to send.

The Bottom Line
You can quickly solve the "Shared Album not working" issue with the seven solutions introduced above. If none of them works to help you or you don't want to use the iCloud sharing feature, get EaseUS MobiMover to your computer and let it help you transfer data between two iOS devices or between an iPhone/iPad and a computer.
Was This Page Helpful?
Daisy is the Senior editor of the writing team for EaseUS. She has been working in EaseUS for over ten years, starting from a technical writer to a team leader of the content group. As a professional author for over 10 years, she writes a lot to help people overcome their tech troubles.
Written bySofia Albert
Sofia has been involved with tech ever since she joined the EaseUS editor team in March 2011 and now she is a senior website editor. She is good at solving various iPhone and Android issues, such as iPhone or Android data transfer & recovery. Rich experience in software companies helps her create a lot of popular articles.
Related Articles
我转移iMessage从iPhone到iPhone |转移Messages from iPhone to PC
![author icon]() Myra/Apr 18, 2023
Myra/Apr 18, 2023AirDrop Not Working on iOS 11 iPhone/iPad - How to Fix?
![author icon]() Myra/Apr 18, 2023
Myra/Apr 18, 2023How to Sync iMessages from iPhone to Mac without iCloud
![author icon]() Myra/Apr 18, 2023
Myra/Apr 18, 2023Top 7 Twitter Video Downloader App for iPhone and Android
![author icon]() Sofia Albert/Apr 18, 2023
Sofia Albert/Apr 18, 2023

