Apple will add many new features to each iOS version and some of them can be greater breakthroughs than ever. For users who haveupdated to iOS 11or iOS 12 coming soon, you may find an undeclared but interesting function named screen recording, which can record everything on iPhone's screen without time limits: snapchat, videos, music, in-app operations, and many more. However, many users are reporting theiPhone screen recording not working on iOS 11(you are more likely encounter in iOS 12 ) after starting from the Control Center, includingiOS 11screen recording no sound. If you are one of them and want to fix these issues, just follow guides below to troubleshoot on iPhone 6/6S/6S Plus/7/7 Plus/8/8 Plus/X and the new-coming devices.
How to fix iOS 12/11 screen recording (audio) not working
Part 1How to fix iOS 12/11 screen recording no sound on iPhone/iPad
米ethod 1.Turn on the Microphone Audio
Screen Recording enables you to choose to record both the audio & video. If the Screen Recording is working but with no audio, you must have turned off the "米icrophone Audio".
第一步:进入Control Centreand find theScreen Recordicon.
Step 2: Press & hold on the Screen Recording button until you see a pop-up with米icrophone audiooption.
Step 3: Tap米icrophoneicon to turn Audio On in red color.
![turn on microphone]()
If the microphone is on and screen recording no sound still, you can try to turn it off and on for several times. If the problem can’t be solved in this way, move on to the next action.
米ethod 2.Restart your iPhone/iPad
If you make sure the screen recording is on, but it still won't work, then you can try to restart your device to fix iOS 11/12 screen recording not working issue.
Restart iPhone 8/iPhone 7: Press and hold the Side button until the slider appears. Drag the slider to turn off your iPhone. After about 30 seconds later, press and hold the Side button again until the Apple logo appears.
Restart iPhone X: Press and hold the Side button and either volume button until the slider appears. Drag the slider to turn off your iPhone X. After about 30 seconds later, press and hold the Side button again until you see the Apple logo.
米ethod 3.Reset All Settings
Reset All Settings on iPhone/iPad could be a very effective strategy in many situations, likeiPhone 8/X touch screen not working.
Got toSettings>General>Reset>Reset All Settings. This way will not clear the exiting but just reset the general settings in notifications, Touch ID, brightness, and some other features.
米ethod 4.Restore your iPhone/iPad
- Connect your iPhone/iPad to your computer via a USB cable.
- Launch iTunes and click on the device icon in the upper left corner of iTunes.
- ClickRestore Backup. When the option appears, choose the latest iTunes backup and clickRestore. If you have encrypted the iTunes backup, you need to enter the password to unlock the iPhone backup.
![restore your iPhone to fix iOS 11 screenshot not working]()
-
Warning
-
Restore your iPhone or iPad can only proceed when you have backed up your iPhone before and will erase the previous files on your device. Therefore, in order to avoid data loss, you'd better backup your iPhone regularly with iTunes, iCloud or a 100% free iPhone data transfer tool, like theEaseUS MobiMover Freethat enables you to transfer photos, videos, audios, books, contacts, messages and more from iOS device to Windows or Mac computer in a simple click.
Part 2How to solve other iPhone screen recording not working problems
1. Screen recording not saving on iOS 12/11
Generally speaking, after you have stopped the screen recording, a notification will occur like the sample screenshot below to tell you the screen recording video has been saved to your Photos app. However, if you have not enough space, the screen recording won't be saved. If so, you need to free up more space on your iPhone by deleting useless files or transferring files from iPhone to PC for backup.
Go toSettings>General>iPhone Storage> Delete unwanted apps or files as you need.
![screen recording not saving]()
2. iPhone getting hot when screen recording
Another apparent problem of iOS 11 screen recording not working is iPhone getting too hot. It's too normal for your iPhone gets hot when you are recording, watching videos and playing games. However, you still can improve this status by using the following small tips.
- Stop some important heating applications like Bluetooth, games, videos and GPS service. if you don't need them during the record.
- Unplug iPhone if it's charging until you finish the screen recording.
3. Screen recorder crashes on iOS 12/11
If your iPhone or iPad is out of date, like iPhone 5 and iPad 4thgeneration, the iOS 11/12 may work in a bad status. If you have updated to iOS 11 or iOS 12 Beta on these devices, you still have the choice to downgrade to iOS 10/10.3.3. Just do it carefully.
See More: How to export screen recording videos from iPhone to computer
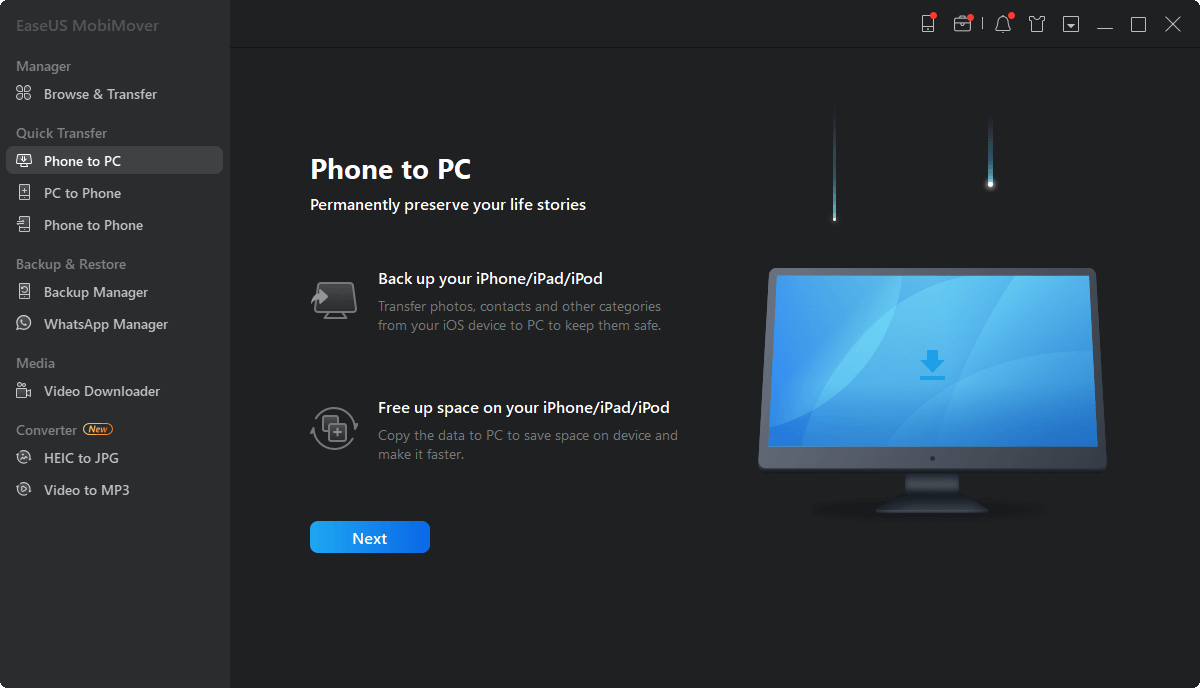
After you have fixed the iOS 11 screen recording not working problem, you will save more and more screen recording videos on your iPhone or iPad. As time goes day by day, they will run out of your device space and remain little memory for new files. Then, you need to export and transfer these screen recording videos to PC to free up more space. Here, we will recommend you the unique 100%free iPhone data transfer softwarein the market to you, that isEaseUS MobiMover Freethat enables you to move contacts, messages, notes, calendars, voice mails, books, Safari bookmarks & history, photos, videos, and audios to PC/laptop with simple one-click. What's more, if you want totransfer files from PC to iPhonein the vice verso, MobiMover Free also can help you reach the goal in a data-safe way. Now, let's check how to do it with ease.
Step 1.Connect your iPhone to your computer and tap "Trust" on your iPhone screen to continue. Run EaseUS MobiMover and choose "Phone to PC" > "Next".
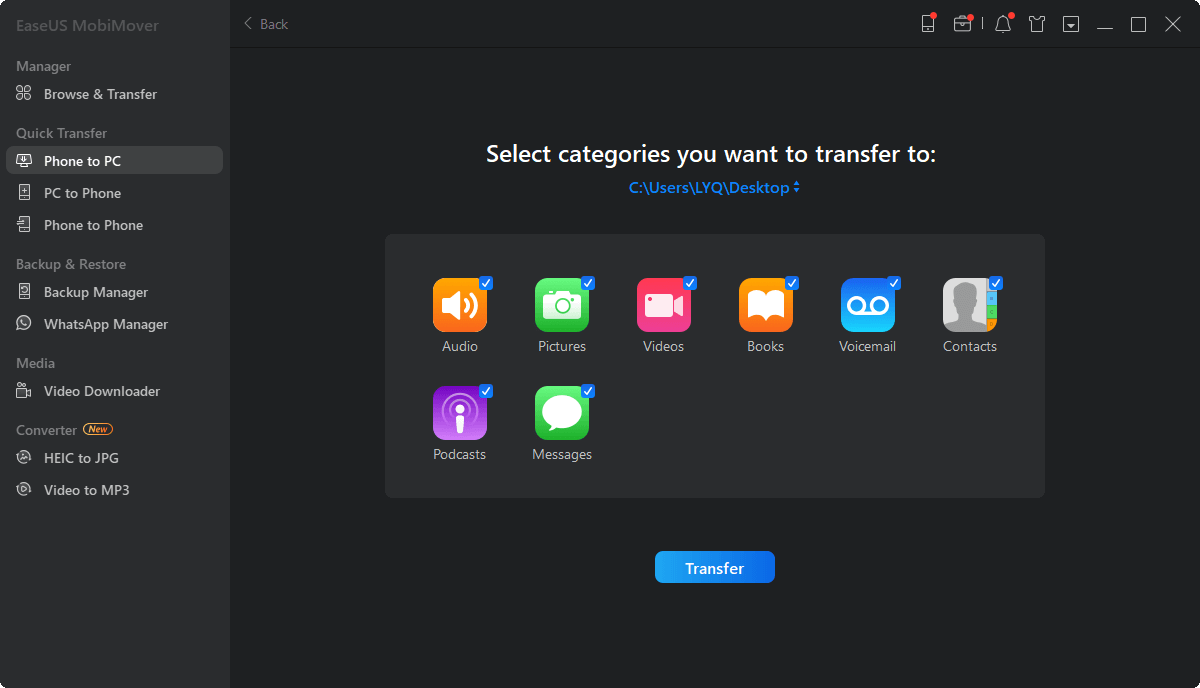
Step 2.Select "Videos" among the options and click the default path to set a custom storage path if you need to. Afterward, click "Transfer".
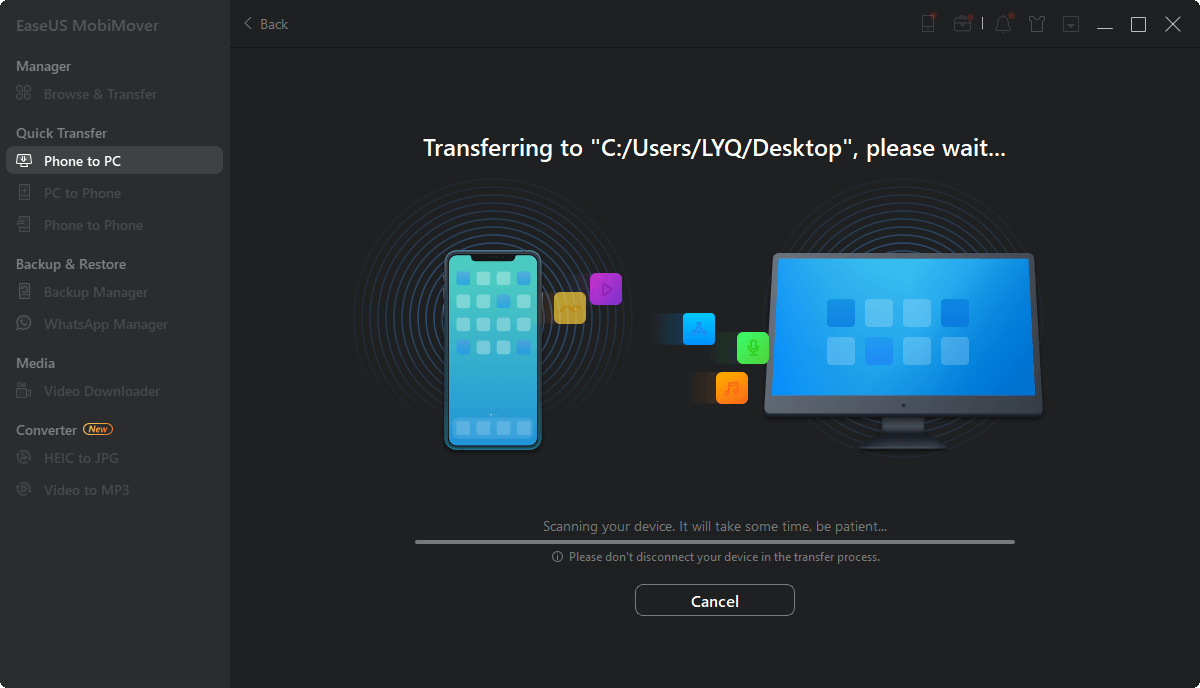
Step 3.When the transfer process has finished, you can go to view the videos on your computer.
 HOT
HOT